Friday 20 June 2014

How to Install Ubuntu Restricted Extras

Ubuntu restricted extras consists of commonly used applications with restricted copyrights which Ubuntu cannot bundle with the OS legally. However, you are free to download these codecs and applications on yourself one by one from their respective sites or you can use Ubuntu restricted extras that include all these essential applications. 

How to Install Ubuntu Restriced Extras
If you install Ubuntu for the first time, you will find that you can neither play mp3 files nor can watch videos. The codecs are not pre-installed. You will not be able to see any flash content over web while browsing your favorite website. You can download these one at a time or you can install Ubuntu restricted extras which will install all at once.

Ubuntu restricted extras will install codecs, java, flash and much more all in one go. It is always recommended as the first package which every Ubuntu user should install. In this article, you will learn how to install Ubuntu restricted extras from Ubuntu Software Center and from the terminal. Installing Ubuntu restricted extras will pull in support for mp3 playback and decoding and support for various other audio formats, Microsoft fonts, Flash plugins, LAME to create compressed audio files, and DVD playback.

Install Ubuntu restricted extras from Ubuntu Software Center

Open the Ubuntu Software Center and search for "Ubuntu restricted extras". Next, Install the package.

How to Install Ubuntu Restriced Extras

Install Ubuntu Restricted Extras through terminal

Alternatively, you can install Ubuntu restricted extras through terminal command. Open the terminal and type the following command to install Ubuntu restricted extras. 

sudo apt-get install ubuntu-restricted-extras

You may be asked for your root password.

Thursday 19 June 2014

How to compile and run C/C++ code in Linux

How to compile and run C/C++ code in Linux
In case you have installed Linux on your system and need to compile and run C/C++ code in the Linux environment, you will need to install GNU Compiler Collection and a text editor. There are many text editors available and here's the Top 3 Open Source text editors for Linux.

To install GCC (GNU's Compiler Collection) 

Debian / Ubuntu based Distributions can use the following commands to install the compiler collection to compile and run C/C++ programs.

sudo apt-get update
sudo apt-get install build-essential manpages-dev

In case, you are using Fedora, RedHat or CentOS, you can use the yum command to install it.

yum groupinstall 'Development Tools'

How to compile and run C/C++ program

The next step is to create a C/C++ file using any text-editor. Open the text editor, type the code
 
How to compile and run C/C++ code in Linux
#include<stdio.h>
int main(void)
{
   printf("Hello World");
   return 0;
}

and save it under any name say hello.c

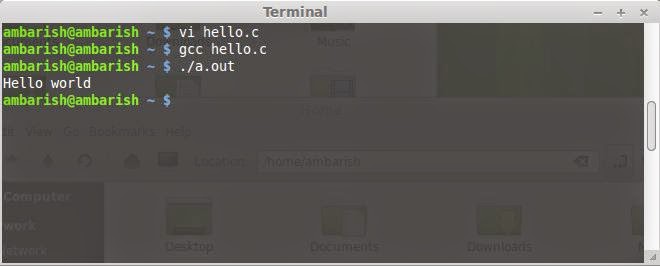
Now, you can use the gcc command to to compile the code you have just written.

gcc hello.c

To run the compiled file, type

./a.out 

How to compile and run C/C++ code in Linux

You have read how to compile and run C/C++ code in Linux. If you want to set up Debian in a virtual box: Installing Debian on Oracle VM Virtual Box [Windows 7 Host.

Wednesday 18 June 2014

Linux Mint - from freedom came elegance.

The article was contributed to www.beopensource.com more than 3 years ago but still hold relevance to every word!

Maybe I'm stating the obvious here - if so, forgive me.

As I see it, the only difficulty to using almost any distribution of Linux is in the setting-up stage. Once it has been installed and all software is in place, a user need not even be aware that it is Linux behind the applications he or she is using. We in this group are here because we are enthusiasts, to a greater or lesser extent - we enjoy getting to grips with the technicalities and moulding a system that suits us. And, of course, that is one of the keystones of the Linux movement (along with open-source and flexibility) but not everyone feels the same.

A few years ago, fired with zeal for the principles of Linux, and keen to get away from the suffocating hold that Microsoft has on the computing world, I started looking around for a distribution that was right for me. I crashed and burned. First I tried Red Hat, then various flavours of Ubuntu. Because I was completely new to Linux, I didn't understand how they worked, and the terminology was unfamiliar. I did get Ubuntu working, but found it, and the software bundled with it, crude (compared with the Windows stuff I was familiar with). 


Then, last year, I discovered Linux Mint. The beauty of Mint is that it makes the process of getting started much easier, and the resulting desktops are intuitive and attractive. The install process, for instance, which offers an automated installation to default settings, perfect for new users and technophobes (heck, it even installs all the most popular applications, and makes it easy to add many others). However, because it is Linux, it also has all the 'power' features that make Linux so popular.

So what I am saying here is that, in my opinion, Mint is changing the way Linux is perceived. It is no longer too complicated and esoteric for people who just want a computer that works for them. That is why I am such a fan - Mint is opening up Linux to the wider world.


Courtesy : Liz Mills 

Monday 16 June 2014

How to install LibreOffice 4.2 in Linux

LibreOffice is one of the most widely used office suite for Linux users. It is a free and open source office suite developed by The Document Foundation comprising programs to do word processing, spreadsheets, presentations, diagrams and drawings, databases and much more. LibreOffice provides compatibility with Microsoft Office and the documents can be imported to LibreOffice that are developed in MS Office. 

How to install LibreOffice 4.2 in Linux

Application included in LibreOffice

Writer Similar to MS Word, it works as a word processor and can be used as a basic text editor. 

Calc A Spreadsheet program

Impress A presentation program, can be exported to swf format hence can be viewed on any system with Adobe Flash Player.

Draw A vector graphics editor and diagramming tool 

Math Designed for creating and editing mathematical formula

Base A database management system

LibreOffice is licensed under LGPLv3. 

In this article, I am going to tell you how to remove earlier LibreOffice installations and install LibreOffice 4.2 on Linux. The article mainly focus on installing LibreOffice 4.2 on Debian/Ubuntu based distributions. 

Uninstall earlier LibreOffice installation

You can install LibreOffice 4.2 along with previous versions without much problem. In case you want to uninstall the earlier version to free up your resources, 

sudo apt-get remove libreoffice-core

Install LibreOffice 4.2 in Linux

You can download LibreOffice 4.2 from the official website.

libreoffice.org/download/libreoffice-fresh/

You can extract this tar.gz file through terminal or by right clicking on it and extracting it.

After extracting, open a terminal and navigate to the current directory using cd command. Read more : Keyboard shortcuts within Terminal

Finall, install the LibreOffice package you have downloaded. 

sudo dpkg -i *.deb

To install the program shortcuts in the menu, navigate to the "desktop-integration" sub directory, and run the following command

sudo dpkg -i *.deb

Finally, you have installed LibreOffice 4.2 in your Linux system. This process will work in all Debian based / Ubuntu based distributions like Mint, *buntu, Debian etc. 

Sunday 15 June 2014

How to Install / Upgrade to Linux Kernel 3.15

Linux Kernel 3.15 has finally been announced by Linus Torvalds and there's much more to offer from Linux. 

How to Install / Upgrade to Linux Kernel 3.15

What's new in Linux Kernel 3.15
  • USB: Avoid runtime suspend loops for HCDs that can't handle suspend/resume
  • drm/radeon/dpm: resume fixes for some systems
  • USB: serial: option: add support for Novatel E371 PCIe card
  • x86, vdso: Fix an OOPS accessing the HPET mapping w/o an HPET
  • usb: cdc-wdm: export cdc-wdm uapi header
  • Btrfs: send, fix corrupted path strings for long paths 
You can read what Linus Torvalds has to say and all the things Linux Kernel 3.15 has to offer at https://lkml.org/lkml/2014/6/8/70

Install / Upgrade to Linux Kernel 3.15 

Run these commands in a terminal one-by-one to install / upgrade to Linux kernel 3.15.

For 32-bit system

wget http://kernel.ubuntu.com/~kernel-ppa/mainline/v3.15-utopic/linux-headers-3.15.0-031500-generic_3.15.0-031500.201406081435_i386.deb 

wget http://kernel.ubuntu.com/~kernel-ppa/mainline/v3.15-utopic/linux-headers-3.15.0-031500_3.15.0-031500.201406081435_all.deb 

wget http://kernel.ubuntu.com/~kernel-ppa/mainline/v3.15-utopic/linux-image-3.15.0-031500-generic_3.15.0-031500.201406081435_i386.deb 

sudo dpkg -i linux-headers-3.15.0-*.deb linux-image-3.15.0-*.deb

For 64-bit system

wget http://kernel.ubuntu.com/~kernel-ppa/mainline/v3.15-utopic/linux-headers-3.15.0-031500-generic_3.15.0-031500.201406081435_amd64.deb

wget http://kernel.ubuntu.com/~kernel-ppa/mainline/v3.15-utopic/linux-headers-3.15.0-031500_3.15.0-031500.201406081435_all.deb

wget http://kernel.ubuntu.com/~kernel-ppa/mainline/v3.15-utopic/linux-image-3.15.0-031500-generic_3.15.0-031500.201406081435_amd64.deb

sudo dpkg -i linux-headers-3.15.0-*.deb linux-image-3.15.0-*.deb

Once done, restart your computer to see the changes. 

If for some reason, the Linux Kernel 3.15 install / upgrade do not works properly, you can roll back to previous stable kernel by Navigating to Grub > Advanced > Select previous kernel and running this command to uninstall it

sudo apt-get remove linux-headers-3.15.0-* linux-image-3.15.0-*

and updating the grub menu

sudo update-grub

Friday 13 June 2014

How to install Apache on Linux

How to install Apache on LinuxApache is one of the most popular free and open source web server and is aimed at creating a robust, commercial-grade, featureful HTTP (Web) server. Apache is developed and maintained by an open community under the Apache Software Foundation and is commonly used on a Unix like systems. However, it supports a wide range of Operating systems including but not limited to Unix, FreeBSD, Linux, Solaris, Mac, Windows, OS/2. 

Apache provides interface to various server side programming languages like Perl, Python, Tcl and PHP and supports various authentication modules like mod_access, mod_auth etc. Other features include support to Secure Socket Layer SSL and Transport Layer Security, a proxy module, URL rewriter, custom log files, and filtering support. It also features configurable error messages, DBMS based authentication databases and content negotiation, password authentication and digital signature authentication. 

This article covers the compilation and installation of Apache HTTP server on Linux and Unix-like systems. 

Download Apache HTTP server

Apache HTTP server can be downloaded from its source site : download Apache Server.

Alternatively, you can downloading it by opening a terminal and typing the following command 

lynx http://httpd.apache.org/download.cgi

Extracting the downloaded file

You can extract the file by changing the current directory to the one in which the download file is there and typing the following command in the terminal

gzip -d httpd-NN.tar.gz
tar xvf httpd-NN.tar

Configure

./ configure
It will configure the source tree using all the default options. 

Compile

make

Install Apache on Linux

make install

If it asks the root privileges use sudo and enter the root password whenever necessary.

Read more : How to install tar.gz file in Linux

Customize

vi PREFIX /conf/httpd.conf

Start Apache HTTP server

You can now start your Apache HTTP server by running the command 

PREFIX/bin/apachectl -k start

Similarly, to stop the server

PREFIX/bin/apachectl -k stop

As of June 2013, Apache was estimated to serve 54.2% of all active websites and 53.3% of the top servers across all domains. The article gives you an easy step by step procedure to install Apache on Linux and other Unix-like systems.

Note: If you could provide us screenshots of Apache web server, I would appreciate it. You can mail it to mb.linux.world@gmail.com.

You can install Drupal 6/7 on Linux and download the XAMPP from here. 

Download Audacity - free audio recorder and editor

Audacity is a open source and free audio recorder and editor distributed under the GNU General Public License. Audacity is a cross-platform software available for major Operating Systems like Windows, Linux/Unix, Mac OS X and other OS and its interface is available in many languages.

Features
  • Record live audio
  • Record computer playbacks
  • Convert tapes and records into digital recordings
  • Edit common sound files
  • Cut, copy, slice or mix sound clips
  • Editing the speed or pitch of the sound
  • and much more. 
Download Audacity

You can download the free audio recorder Audacity for Windows, Linux, Mac OS X from these links: 


Linux users can alternatively download the source code and compile it by running the command in the Audacity source directory

./configure && make


 Audacity in Linux.

Audacity is one of the best free audio recorder and is in the list of highest downloaded software on sourceforge. You can download and install the free audio recorder and find out how it works for you.

Thursday 12 June 2014

Mozilla to launch $25 smartphone in India

Mozilla to launch $25 smartphone in IndiaMozilla to launch $25 smartphone in IndiaMozilla do not want to give up on its Firefox OS despite the market dominance of iOS and Android and the emergence of Windows Phone after Nokia acquisition. Mozilla has tied up with low-end low cost handset makers in India to bring smartphones under $25 or Rs. 2000. The handsets are to be released within few months and no expected date is yet announced. 

These handsets will target the Indian and Chinese market and are basically targeting people who can't afford a high end Android device. Mozilla chief operating officer Li Gong has confirmed the tie ups and added that these under $25 handsets will provide a momentum to the growing market of Firefox OS. 

Tuesday 10 June 2014

How to install XAMPP in Linux [download links]

Do you have problems setting up Apache web server along with MySQL, PHP and Perl? XAMPP is the solution. The aim of XAMPP is to provide an easy to install distribution for developers making it convenient to set up Apache web server. XAMPP is configured with all the features turned on and is available under GNU General Public License. In this article, I am listing the download links to install XAMPP on Linux, Windows and Mac OS X.


Install XAMPP on Linux

You can download the XAMPP from these links and run it Linux.

PHP 5.4.27 included


PHP 5.5.11 included


Install XAMPP on Windows

XAMPP is a multiple-platform software and is available for Windows, Linux, and Mac OS X. Here's the download link for Windows users:

XAMPP for Windows 32-bit with PHP 5.4.27 Version 1.8.2
XAMPP for Windows 32-bit with PHP 5.5.11 Version 1.8.3

Install XAMPP on Mac

XAMPP for Apple 1.8.2 PHP 5.4.27 included
XAMPP for Apple 1.8.3 PHP 5.4.11 included


P.S. Any screenshots will be very useful. You can mail us at mb.linux.world@gmail.com.

Sunday 8 June 2014

How to install Tor browser - Anonymity online


Tor prevents somebody watching your internet connections from learning what sites you visit and provides anonymity online by hiding your physical location. It is an open source free software that helps you defend against traffic analysis and  protects your freedom and privacy online. Tor browser supports multiple platform and can be installed on Linux, Mac OS X, Windows and even Android.

Tor protects you by bouncing your connections through over 5000 distributed network of relays all around the world. Tor encrypts the original data and the destination IP address several times and sends it through these relays. Each relay then decrypts a layer of encryption to reveal only the next relay in the circuit to pass the remaining encrypted data. The last relay finally decrypts the innermost encryption layer and sends the original data to the destination without knowing the source IP address.

In this article, you will know how to install Tor browser in Linux and Windows.

Install Tor browser in Linux

Step 1: The first step towards installing Tor in Linux is to download it.

Download links: 

32-bit Tor browser bundle
64-bit Tor browser bundle

Step 2: Now run the following command to extract it. 

tar -xvJf tor-browser-linux32-3.6.1_en-US.tar.xz

Replace 32 with 64 if you have downloaded Tor browser bundle for 64-bit Linux.

Step 3: Switch to the Tor browser directory by typing

cd tor-browser_en-US

Step 4: To run the Tor browser run the following script

./start-tor-browser

Note: Do not unpack or run Tor browser as root.

If you have downloaded Tor browser for any other language, replace en-US with that language code given in the file you have downloaded.

Install Tor browser in Windows

Step 1: Download the Tor browser for your system.

Download Links:

Tor browser for Windows

Step 2: Install it by running the exe file and following the instructions.

Click on the Start Tor Browser.exe to run Tor browser and click on connect in the dialogue box. A browser will open.

How to install Tor browser


Installing Tor Browser in Mac

Download the Tor browser for Mac and clicking on it will unarchive it. Click on Tor browser application to run it.

Other benefits of installing Tor browser

1. Tor browser can be used to visit onion sites that are on deep web (also called hidden web). Learn more about hidden web on wikipedia.

2. It can be used to browse websites that has been blocked by your Internet service provider.

Points to keep in mind while using Tor-browser

You do not have complete anonymity since cookies, plugins, javascrips and other third parry factors may still makes your identity vulnerable. Read the Tor FAQs to understand everything about it and how you can customize your apps to remain anonymous.

Saturday 7 June 2014

How to install Drupal 6/7 on Linux

Drupal is a Content Management System that runs on a LAMP server. Drupal is a free software package that allows you to easily organize, manage and publish your content, with an endless variety of customization. 

It is an open source software maintained and developed by various enthusiasts all across the world. Its free to download and use, and redistribute. Drupal provides an easy way yo host blogs, forums and a variety of other contents. It has huge collection of add-ons modules for functionality like advertising, chat boxes, e-commerce, multimedia tools and instant messenger etc. Drupal can be used to everything from personal blogs to even an enterprise applications. Thousands of add-on modules and designs are available for you. 

Technical Requirements to install Drupal

For Drupal 7, you need the following to get started:
Apache Web Server
PHP 5.2 or higher
MySql 5.0 or higher

These three are a part of LAMP architecture. 

Now, the main part is how to install Drupal on Linux. Lets see it. 

Install Drupal on Linux

Method 1 : LAMP server installation

You can install Drupal in Linux by installing the entire LAMP stack. 

sudo tasksel install lamp-server

If the tasksel command is not there in your system by default, install it first by

sudo apt-get install tasksel

Method 2: Install Drupal Package from Ubuntu repositories

You can install Drupal 6 or Drupal 7 from the Ubuntu Repositories

sudo apt-get install drupal6
or
sudo apt-get install drupal7

After installing, register the Drupal module with Apache:

sudo cp /etc/drupal/6/apache2.conf /etc/apache2/mods-enabled/drupal.conf

and restart Apache sudo service apache2 restart
Method 3 : Install from Ubuntu software center

You can install both Drupal 6 and Drupal 7 from Ubuntu Software center. 


Final Step after installing Drupal in Linux

Open your browser and open http://localhost/drupal/install.php (replace drupal with drupal6 / drupal7 according to your install), create an account and login. Finally, follow the instructions to finish loading the database and configuring the site.

Other useful links:

Drupal website 
Drupal on wikipedia 

Wednesday 4 June 2014

Ubuntu naming conventions and logic behind it

With Ubuntu 14.04 Trusty Tahr rolled out you must be wondering why Canonical Ltd, the developer of Ubuntu operating system named it Trusty Tahr. Canonical releases a new version of Ubuntu semi-annually and each version is given a codename which is a combination of an adjective and an animal with the same first letter. The version number denotes the year and the month of the release.


Trusty Tahr - an adjective + an animal with the same first letter. 14.04 signifies that it was released in 2014 in the month of April.

Ubuntu Naming Conventions

Version Adjective Animal
4.10 Warty Warthog
5.04 Hoary Hedgehog
5.10 Breezy Badger
6.06 LTS Dapper Drake
6.10 Edgy Eft
7.04 Feisty Fawn
7.10 Gutsy Gibbon
8.04 LTS Hardy Heron
8.10 Intrepid Ibex
9.04 Jaunty Jackalope
9.10 Karmic Koala
10.04 LTS Lucid Lynx
10.10 Maverick Meerkat
11.04 Natty Narwhal
11.10 Oneiric Ocelot
12.04 LTS Precise Pangolin
12.10 Quantaal Quetzal
13.04 Raring Ringtail
13.10 Saucy Salamander
14.04 LTS Trusty Tahr
14.10 Utopic Unicorn

LTS is Long Term Support i.e. Canonical will provide updates to that version for a period of 5 years and paid support is available. Each forth release is a Long Term Support release or you can say the 1st year release in the even year is a Long Term Support Ubuntu release.

If we leave the first two versions, the rest are in the alphabetical order. You can read a detail release information of each version of Ubuntu on Wikipedia.

Other Linux distributions like LinuxMint also has codename logic. Read here: Version numbers and Codename logic in Linux mint.

Monday 2 June 2014

Best Photoshop alternative for Linux - GIMP

With Photoshop not available for Linux, GIMP is the best Photoshop alternative for Linux users. GIMP is an acronym for GNU Image Manipulation Program and can be used to perform various tasks such as photo retouching, image composition and image authoring. It can be used as a simple paint program, for mass image rendering, as an image format converter etc. It can handle almost all file types and have plugins that allows easy addition of new file formats and new filter effect. 


Features

GIMP provides you a customizable interface where you can change the view and the behavior according to your preference. It features a full screen mode allowing you to preview your artwork and simultaneously do the editing work. GNU Image Manipulation Program is one of the best alternative for photshop and the major reason is its photo enhancement features. These enhancement process help you eliminate lens barrel distortions. The included channel mixer gives you the flexibility and power to enhance your black and white photograph and give it a touchy look. 

GIMP supports various file formats like bmp, gif, jpeg, mng, pcx, pdf, png, ps, psd, svg, tiff, tga, xpm, and many others. The GIMP architecture allows to extend format capabilities with plugins available

GIMP for Linux
GIMP for Linux
GIMP for Mac OS X
GIMP for Mac OS X
GIMP for Windows
GIMP for Windows

Downloads
 
GIMP is freely available under Windows, Linux and Mac OS X. You can download the photoshop alternative from its download page http://www.gimp.org/downloads/ according to your preference. If you are having problems in installing GIMP on your system, you can find the installation help here.

There is a official documentation available for GIMP. The documentation includes user manuals for different languages, tutorials and books. The documentation is available at http://www.gimp.org/docs/

Sunday 1 June 2014

How to transform your Linux into Mac OS X

Linux is free and open and has various graphical desktop environments to suit your preference and need. However, if you have been a Mac user for a long time and has migrated to a Linux environment, and still want to enjoy the Mac OS X look and feel, Macbuntu is for you. 


Macbuntu is a Mac OS X transformation pack for Linux. It is an open source project designed to transform Linux appearance and layout into a Mac OS X environment. Although, Macbuntu is largely dedicated to Ubuntu, it can be used in other Debian based Linux Operating Systems.

Features of Macbuntu

Macbuntu significantly transforms your Linux environment to that of a Mac OS X environment. Simple to use and giving the pleasure of Mac on a 100% Linux environment, its popular among the user who do not want to get away with the Mac GUI but want to experience the power of a Linux system. 


Macbuntu provides its own sound themes and includes Paw-OSX and Paw-Ubuntu Plymouth theme. Extensive work has has been done to incorporate Mac OSX backgrounds and fonts. Login screens, cursors, icons, docky and top panel has all been imitated to that of a Mac environment. 

How to install Macbuntu on a Linux system. 


Extract the .tar.gz file you have downloaded on your desktop and run it. You can read how How to install from a .tar.gz file in Linux.

Follow the instruction and you are done. 

You have successfully transformed your Linux into Mac OS X. [It's just a transformation pack much like you get a Windows 7 transformation pack for XP].


Note: Sourceforge mentions that it is not compatible with Ubuntu Netbook edition and The Global Menu does not current work correctly for all applications.