Showing posts with label Terminal. Show all posts

Thursday, 5 April 2018

How to fix broken packages in Ubuntu


If you are a curious guy installing different applications, trying them and removing the one not needed, you must have faced broken packages issue at some point of time. This could be because of various reasons and can to some extent hamper your system's performance. 

Broken packages can make a mess of your system. There could be some dependency missing, or while uninstalling, some part of the application is not removed completely and not allowing a reinstall. 

However, you can easily fix it with a couple of commands. In this article, we will see how to fix broken packages in Ubuntu. 

When you know the package name 

If you know the package name, you can completely remove it with the below command.

sudo dpkg --remove --force-remove-reinstreq <package-name>

Removing the unwanted dependencies

Along with the packages, the dependencies are also installed. However, you remove the application, the dependencies are left as it is. Using the below command, you can remove these unwanted dependencies.

sudo apt-get autoremove

Fix broken packages 

If there are some packages that were automatically installed and are not needed, or there's some broken packages because of some missing components, you can fix it by using the below command, 

sudo apt-get --fix-broken install 

Removing local repository which are no longer needed

You can remove the local repository of the retrieved package files with the below command:

sudo apt-get clean
sudo apt-get autoclean

autoclean deletes the local repository of the retrieved files that can no longer be downloaded and are mostly useless.

The below command removes any packages that are not updated and no longer needed along with the configuration files it needs. 

sudo apt-get --purge remove

Update your system

Chances are that one of the above command will fix broken packages in Ubuntu. Once done, do not forget to update your system.

sudo apt-get update

Do you have any other suggestions to fix broken packages in Ubuntu? Let us know in the comments. 

Sunday, 1 April 2018

How to customize the Linux Terminal


We all love Linux Terminal! Though Linux has evolved over time and provide a better and much competitive Graphical User Interface, Terminal still remains the best part of it. Some of us prefer the App Center and rest add PPAs to install something. Some even go the extent of using Lynx browser in Terminal. 

Not only the Terminal is useful, it is the most powerful part of a Linux system. I'm mostly a terminal guy, and there is always a black window running. Being an Ubuntu user, the one thing I don't like about it, is the default background color which matches the Ubuntu theme. I prefer it mostly black background color with the text either in white or green. 

If you are just bored of the default look of your Terminal, keep reading. In this article, we are showing some of the ways by which you can customize Linux Terminal easily.

Customizing the default Terminal

The easiest way is to customize the default Terminal according to your preference.

Open Terminal and click on Edit > Profile Preferences.

You can see the various options to customize your Terminal. Under the General Tab, you can set the initialization parameters, cursor shape, and text appearances options. Under Color tab, there's option to choose the built-in schemes and default terminal.

As I told you, I personally like a black screen with a dark green text colors, and this is what is looks like.


Under the Color tab, there is an option to select the transparency. Choosing a 100% transparency will make your terminal look like this: 


Additional tip : How to show the system information and logo of your Linux system

Neofetch is an awesome command line interface tool written in bash that displays system information, OS logo and is highly customizable. 

How to install Neofetch

To install Neofetch, open Terminal and type the below command : 

sudo apt-get install neofetch

Once installation completes, just run the below command to use it,

neofetch


So, feel free to change colors in the terminal, adjust transparency and let us know if have any other way to customize your Linux terminal in the comments. 

Sunday, 20 March 2016

How to get BIOS information in Ubuntu

If you want to get all the BIOS information in Ubuntu, there is a handy terminal command you can use.

dmidecode - According to the manual, dmidecode is a tool for dumping a computer's DMI (some say SMBIOS) table contents in a human-readable format. Information such as serial numbers and BIOS revision. Thanks to this table, you can retrieve this information without having to probe for the actual hardware. While this is a good point in terms of report speed and safeness, this also makes the presented information possibly unreliable.

You need to first install dmidecode in your Ubuntu system to get the BIOS information. Use the following command:

sudo apt-get install dmidecode - It will ask for your root password.

ambarish@ambarish-ubuntu:/dev$ sudo apt-get install dmidecode
[sudo] password for ambarish: 
Reading package lists... Done
Building dependency tree       
Reading state information... Done
dmidecode is already the newest version.
dmidecode set to manually installed.
0 upgraded, 0 newly installed, 0 to remove and 0 not upgraded.

Once done successfully, use the following command to get the BIOS release date:


ambarish@ambarish-ubuntu:/dev$ sudo dmidecode --string bios-release-date
12/01/2006

Also, to get the other BIOS releated information, use the command sudo biosdecode. It will display the structure of your BIOS along with several other informations like Router ID, OEM identifier, No of structures and max structure size.

ambarish@ambarish-ubuntu:/dev$ sudo biosdecode
# biosdecode 2.12
ACPI 2.0 present.
OEM Identifier: VBOX  
RSD Table 32-bit Address: 0x7FFF0000
XSD Table 64-bit Address: 0x000000007FFF0030
BIOS32 Service Directory present.
Revision: 0
Calling Interface Address: 0x000FDA00
PCI Interrupt Routing 1.0 present.
Router ID: 00:01.0
Exclusive IRQs: None
Compatible Router: 8086:7000
Slot Entry 1: ID 00:01, on-board
Slot Entry 2: ID 00:02, slot number 1
....
Slot Entry 30: ID 00:1e, slot number 29 SMBIOS 2.5 present.
Structure Table Length: 450 bytes
Structure Table Address: 0x000E1000
Number Of Structures: 10
Maximum Structure Size: 255 bytes


I hope that helps. 

Thursday, 17 March 2016

How to find Kernel version, release info and disk partition info in Ubuntu

Here, we will see how to find Kernel version, Ubuntu release information and disk partition information in Ubuntu. 

uname -a  : print certain system information. Here's the output.

terminal output

Linux ambarish-ubuntu 4.2.0-34-generic #39~14.04.1-Ubuntu SMP Fri Mar 11 11:38:02 UTC 2016 x86_64 x86_64 x86_64 GNU/Linux

Description.

       Print certain system information. With no OPTION, same as -s.

       -a, --all
              print all information, in the following order, except omit -p and -i if unknown:

       -s, --kernel-name
              print the kernel name

       -n, --nodename
              print the network node hostname

       -r, --kernel-release
              print the kernel release

       -v, --kernel-version
              print the kernel version

       -m, --machine
              print the machine hardware name

       -p, --processor
              print the processor type or "unknown"

       -i, --hardware-platform
              print the hardware platform or "unknown"

       -o, --operating-system
              print the operating system

lsb_release : to print distribution-specific information.

terminal output

Description.

       The lsb_release command provides certain LSB (Linux Standard Base) and distribution-specific information.

       If no options are given, the -v option is assumed.

       -v, --version
              Show the version of the LSB against which your current installation is compliant. The  version is expressed as a colon separated list of LSB module descriptions.

       -i, --id
              Display the distributor's ID.

       -d, --description
              Display a description of the currently installed distribution.

       -r, --release
              Display the release number of the currently installed distribution.
 
       -c, --codename
              Display the code name of the currently installed distribution.

       -a, --all
              Display all of the above information.

       -s, --short
              Use the short output format for any information displayed. This format omits the leading header(s).

       -h, --help
              Show summary of options.

       -e, --exclude list
              Exclude the devices specified by a comma-separated list of major device numbers. Note that RAM disks (major=1) are excluded by default.

       -f, --fs
              Output info about filesystems.  

       -h, --help
              Print a help text and exit.

       -i, --ascii
              Use ASCII characters for tree formatting.

       -m, --perms
              Output  info  about   device   owner,   group   and   mode.

       -l, --list
              Use the list output format.

       -n, --noheadings
              Do not print a header line.

       -o, --output list
              Specify which output columns to print.  Use --help to get a list of all supported columns.

       -P, --pairs
              Use key="value" output format.

       -r, --raw
              Use the raw output format.

lsblk -o NAME,SIZE : to display disk partition in a human readable format.

terminal output


In case, you want to print all the information Kernel version, release info and disk partition info with a single command, use the below command:

sudo fdisk -l; uname -a; lsb_release -a  

terminal output

If you want to add something, please mention that in comments. 

Friday, 29 January 2016

File permissions in Linux [with infographics]

The Linux/Unix systems are multi-user systems and each file and directory has its own permission. This is in fact can be related to the origin of Unix which was conceived as a network system with multi users simultaneously working in the same environment. In that case, it is important to distinguish each file and directory's access rights to keep it secure. It is important to control which user has the right to modify or delete any file or directory.

Check file permission symbols


Run the command ls -l and you will the list of files and directories like below:

-rw-r--r--  1  ambarish  users  1201  Dec 12  13:10 info.txt

This basically represents that the file info.txt was created on Dec 12, at 13:10 and has a size of 1201 bytes. It belongs to the group "users" and is owned by the user "ambarish" in particular.

-rw-r--r--, drw-r--r-- basically represents the file permission.

1 - denotes the file type. a hyphen (-) denotes a regular file. "d" denotes a directory.
2,3,4 denotes read, write, execute permissions for the owner of file.
5,6,7 denotes read, write, execute permissions for members of group owning the file.
8,9,0 denoted read, write, execute permissions for all other users.

How to set permission of a file/directory


We can use chmod command in Linux to set permission of a file or a directory. They syntax is

chmod [permissions] [filename]

The permission can be assigned to any file or directory using the octal number system. 4 represents read access, 2 for write and 1 is for the access to execute.

So, if you want to assign a file read / write / execute access, it will be 4+2+1=7.

e.g.    chmod 777 info.txt 

will change the file access rights such that owner, group, and others and read, write and execute the file. You have to work out with the numbers.

7 = 4+2+1 - read, write, execute
6 = 4+2 - read write
5 = 4+1 - read execute
4 - read
3 = 2 + 1 write, execute
2 - write
1 - execute

Here's an infographic showing the file permissions in Linux/Unix.

File permissions in Linux infographics

Source: itsfoss.com

Anything I missed? Please add it in the comments section.

Friday, 16 May 2014

7 Commands for Getting System Information in Linux

There are commands that you can use in Terminal to get your system information like disk space usage, free and used memory, information about running processes and system resources, machine and kernel information etc.

Getting system information in Linux - Terminal commands

> Open Terminal. 

df   The df command displays filesystem disk usage for all mounted portions. However, it will provide the system disk usage information in a blocks. You can use df -h to generate report in megabytes and gigabytes instead of blocks, h stands for "human readable".

 Getting System Information in Linux

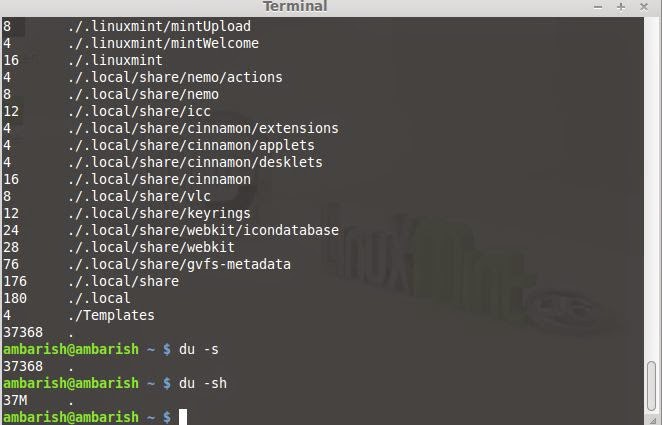
du   du commands displays the disk usage for a directory. Variants are du -s, du -h, du -sh. s stands for "Summary" and h means "Human Readable".

 Getting System Information in Linux

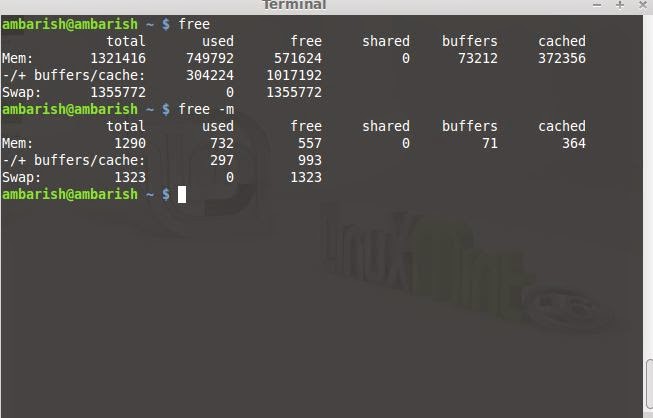
free   It displays the amount of free and used memory in the system. free -m will give the information in megabytes.

 Getting System Information in Linux

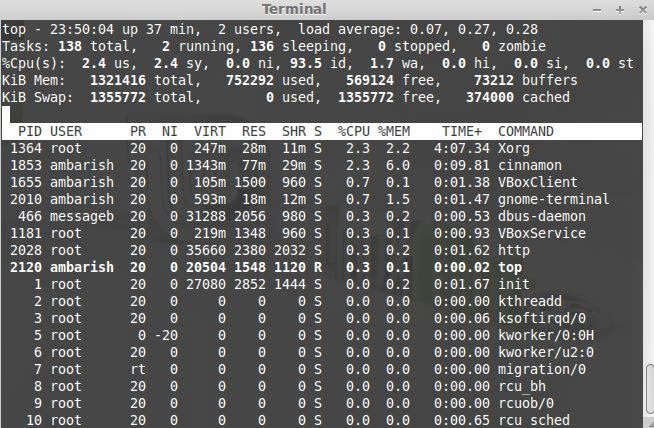
top   top is table of processes. It displays information on your Linux system, running processes and system resources that includes CPU, RAM and swap usage. It all displays the number of tasks being run.

 Getting System Information in Linux
You may have to press "q" to exit.

uname -a   The uname command with -a option prints all system information, including machine name, kernel name and version, and a few other details.

 Getting System Information in Linux

lsb_release -a    The lsb_release command with the -a option prints version information for the Linux release you're running.

 Getting System Information in Linux

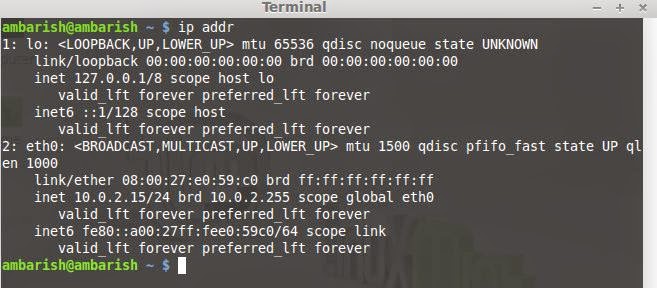
ip addr   It prints the ip address of your machine. 

 Getting System Information in Linux

These 7 commands will help you in getting basic system information in Linux. Do I miss something? Please add it in the comment section and I will update the post.

Note: I am using Linux Mint 16 Petra in Oracle VM Virtual Box 4.3.2 r90405.

Tuesday, 13 May 2014

Keyboard shortcuts within Terminal

terminal icon
Linux has evolved from the traditional command line interface to graphical user interfaces. There are various Linux desktop environments which support high resolution graphical way of handling everything with some clicks. However, there is a group of Linux users who still prefer the command line way of doing almost everything, the reason behind is that is faster and more powerful. Command line has been and will always be an integral and important part of any Linux distribution. In this article, I am sharing the keyboard shortcuts that you can use within the command-line terminal.

Starting a terminal.

You can start a terminal by searching it in the "Dash" in Unity desktop environment. In Gnome, navigate to Application Menu > Accessories > Terminal.

You can alternatively use Ctrl + Alt + T to open the terminal in almost every Linux distribution with any desktop environment.
Terminal WIndows

Keyboard shortcuts within Terminal.

The list do not cover the terminal commands but the keyboard shortcuts within a Terminal that can be used to handle the commands in an efficient way.

Enter   Run a command

Up Arrow   Show the previous command.

!$   Repeats the last argument of the previous command.

Ctrl-a   Move the cursor to the start of the line.

Ctrl-e   Move the cursor to the end of the line.

Alt-x   Move the cursor to the next occurrence of x.

Alt-Ctrl-x   Moves the cursor to the previous occurrence of x.

Ctrl-u   Delete everything from the beginning of the line to the cursor position.

Ctrl-k   Delete everything from the cursor position to the end of the line.

Ctrl-w   Delete from the cursor to the start of the word.

Ctrl-y   Paste texts from the clipboards.

Ctrl-t   Swap the two characters before the cursor.

Ctrl-l   Clear the screen with the current line at the top of the screen.

Ctrl-x Ctrl-u   Undo the last changes.

Ctrl-Alt-r   Undo all changes to the line.

Ctrl-Alt-e   Expand command line.

Ctrl-r   Allows you to type a part of the command you're looking for and finds it.

Alt-p   Non-incremental reverse search of the history.

!!   Execute last command in the history.

!abc   Execute last command in history beginning with abc.

!n   Execute nth command in history.

^abc^xyz   Replace first occurrence of abc with xyz in last command and execute it.  

Ctrl-d   Log out of current session, similar to exit

This is a list of the keyboard shortcuts you can use within a terminal to handle things in a better way. Try these gradually and you will save lot of time and effort.

Do I miss something? Please comment if you know some more keyboard shortcuts withing terminal which is not in the above list.

Update: +Jörg Linuxfreund pointed out that the Ctrl + Alt + T doesn't work in all Linux distributions/ desktop environments.

Opening a terminal in KDE. KDE comes with a console application Konsole. You will find it in Programs > System. You can try Alt + F2 which opens a small windows where you can type the application name konsole. In case Konsole is not there, you may try "xterm" that will do the same work for you.

Other Popular terminals for KDE are tilda and yakuake. You can download the stable release of yakuake here.