Tuesday 28 June 2016

Installing GNOME in Ubuntu 16.04

Before I proceed, you should know that Ubuntu always comes with a GNOME flavor and you can download and install the complete OS from GetUbuntuGNOME page

Now, if you have installed the usual Ubuntu 16.04 LTS with Unity desktop interface and want to install GNOME in your Ubuntu system, this article will demonstrate you the steps. 

It's been a while for the launch of Ubuntu 16.04 LTS Xenial Xerus and the installation process for GNOME is not that hard. GNOME 3 comes with a nice user interface with an easy to use design and comes with various features

Lets see how we can install GNOME 3 in our Ubuntu 16.04.

Open terminal through Ubuntu Dash or by pressing Ctrl + Alt + T and type in the following command:

sudo apt-get install gnome-shell

This will ask you the root password and 100mb free disk space. Once confirmed, it will install the GNOME Shell. Note that GNOME shell and GNOME desktop are different and this will install the shell only with the user interface. 

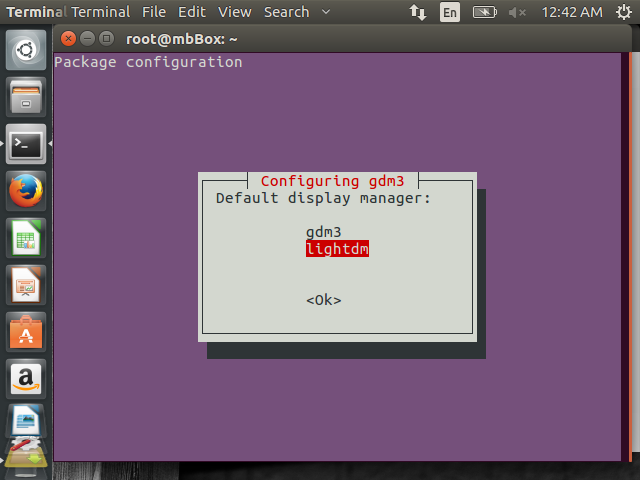
In the installation process, the package configuration will ask for gdm3 / lightdm. Select lightdm and press <OK>.

GNOME properties


Once done, this will finish up the installation in some min. Log off your system and at the login screen switch to GNOME from Ubuntu. 

Installing GNOME in Ubuntu 16.04

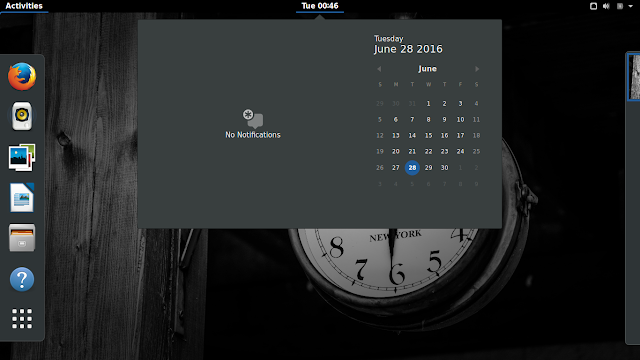
Once you login with your credentials in the GNOME shell, you will see the GNOME shell. Try it, use it and love it. 

GNOME in Ubuntu 16.04

Now, in case you are not satisfied with GNOME in Ubuntu 16.04 and remove it, just type in the following command in the terminal.

sudo apt-get remove gnome-shell

Feels nice, isn't it? Tell us in the comments!
Monday 27 June 2016

How to create a permanent Alias in Ubuntu

Alias is a great way to define a command to do a particular tasks. To understand the usefulness, relate it to this: the normal rm command won't ask for a confirmation message if you want to remove a file. This may sometime lead to removal of some files by mistake and you wish at that time that there should have been a confirmation message warning. Now, you can always use "-i" with rm to ask for a confirmation each time you run the command, or you can create an alias for rm which should execute the command rm -i.

This was the first importance. Another benefit of using alias is to create your own commands. If you want to use ls for the equivalence of ls -lart, you can create on such alias. Also, if you want to create a whole different command say xxx to display files, you can alias xxx to ls. 

Creating alias is very easy in Linux. I am showing an example of aliasing ls -lart with ls so that each time you use ls, the output shown will be that of ls -lart

The first method is to define the alias in the terminal. Type in the following command in the terminal: 

alias ls='ls -lart'

Now, each time you type ls and press enter, you actually executed ls -lart command. 

But, this is a temperory solution and as soon as you close the terminal, the alias is destroyed and you need to create it again in your next session. 

There is another way to create a permanent alias in Ubuntu. For creating a permanent alias, you need to make changes in the file ~/.bashrc and execute it once for the user. 

To edit the file, type gedit ~/.bashrc in your terminal and add the following line at the bottom of the file. 

alias ls='ls -lart'


Save and exit. Now type in the following command in the terminal,

. ~/.bashrc

and you can use ls to see the output of ls -lart. You can also use the VI editor to edit the file and make changes. 


You can see in the above screenshot how ls command is giving an output equivalent to ls -lart. I have made the changes for root user. This alias will work even after you close the terminal or restart your system. This is how you create a permanent alias in Ubuntu.  

Sunday 26 June 2016

How to Install Unity 8 in Ubuntu 16.04

Ubuntu 16.04 Xenial Xerus still comes with the Unity 7 since Unity 8 is still under active development and may contain various bugs and missing features. But, if your wait is not getting over and you still want to install Unity 8 in Ubuntu 16.04, you can easily do so. In this tutorial, I will tell you how I installed Unity 8 in Ubuntu 16.04.

Note: Before you proceed, you must know that Unity 8 is still under development and you may face various issues and bugs. 

And, it is not supported in Virtual Box. You can only install and use it if Ubuntu is installed in your system and not on Virtual Box. 

To install Unity 8, open Terminal and type the following command (or copy paste). 

sudo apt-get install unity8-desktop-session-mir

It will ask for your permission to download some files. Once done, this will install Mir and Unity 8 and you need to logout and login again to see the Unity 8 login option. 


This is what my login screen looks like. You can see the option of Unity8-Mir, click on it, provide the credentials and you should be good to use it. 

In case Unity 8 didn't work for you and you are not satisfied by it, you can uninstall / remove it easily to switch back to Unity 7 in your Ubuntu 16.04 system. 

Type in the following command at terminal to remove Unity 8. 

sudo apt-get remove unity8-desktop-session-mir
sudo apt-get autoremove

This will remove the Unity 8 Desktop and Mir and also the dependencies. Have you already installed Unity 8 and tried? How's you experience, tell us in the comments. 

You can also install Cinnamon Desktop Environment in Ubuntu. and if you have still not upgraded to Ubuntu 16.04 LTS Xenial Xerus, you should do it!  

Wednesday 15 June 2016

How to install Cinnamon Desktop environment in Ubuntu

There is no official Cinnamon support for Ubuntu 14.04. Cinnamon support for Ubuntu has ended from 14.04, and the only ways to download it is through unofficial PPAs. Cinnamon, unlike Unity the default desktop env in Ubuntu, is light weight and more performance oriented. You will need to install Cinnamon desktop environment in Ubuntu from unofficial PPAs.

If you have been a Cinnamon Desktop fan and wish to install in Ubuntu, you can follow the following steps.

Open Terminal and type in the following commands:

sudo add-apt-repository ppa:tsvetko.tsvetkov/cinnamon
sudo apt-get update
sudo apt-get install cinnamon

Enter root password whenever it asks it.

Once all the repositories are downloaded and installed, restart your system and select Cinnamon from the Login console.


Login screen 
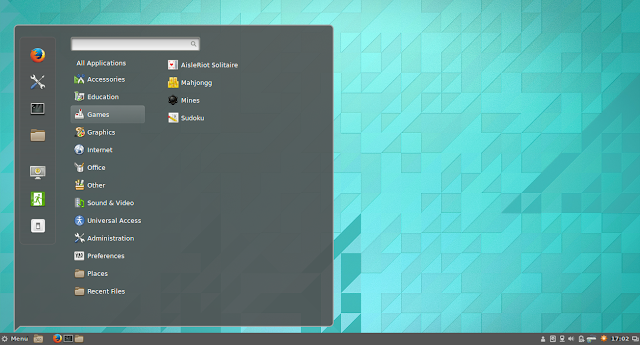
Ubuntu Cinnamon desktop

Do you believe the support for Cinnamon Desktop environment should not have ended? There are guys who always complain about the Unity desktop with which Ubuntu is shipped. 

Ubuntu 16.10 Yakkety Yak to run on Linux Kernel 4.8

Canonical in a newsletter confirmed that they are targeting Kernel v4.8 for its next stable release Ubuntu 16.10 Yakkety Yak. It's been more than a month since Ubuntu 16.04 LTS has been rolled out and the development for Ubuntu 16.10 is gaining momentum now. 


As of now, the 16.10 development has been based on the Kernel version v4.4 used by 16.04 and now the Canonical has confirmed that they are shifting to v4.6 and subsequently to 4.7 and then v4.8. 

Ubuntu 16.10 Yakkety Yak will be a standard version and will be held for 9 months, unlike the Ubuntu 16.04 which a LTS version with 5 years of support. The team has reported that Ubuntu 16.10 will jump to Kernel 4.6 and then on 4.7. Finally it will be launched with Linux Kernel 4.8 for better system performance and greater security. The development for Linux 4.8 is speculated to start between July 17-24, after the release of Linux 4.7.

The final version of Kernel v4.8 will be ready by end og Spetember just before the arrival of Ubuntu 16.10.

Thursday 2 June 2016

Ubuntu based BackBox Linux 4.6 released with Linux Kernel 4.2

The BackBox team has released the last of 4 minor releases, BackBox Linux 4.6 with Kernel 4.2 and other fixing some bugs along with updating base system and tools. 

BackBox Linux 4.6
BackBox Linux 4.6 Menu screenshot

Ubuntu based BackBox Linux distribution is maintained by Raffaele Forte who is the founder and main developer and is designed for penetration testing and security assessment providing a network and systems analysis toolkit. 

BackBox Linux includes some of the most commonly used security and analysis tool and is built on Ubuntu codebase. The main usage of BackBox Linux includes (but is not limited to) web application analysis, computer forensic analysis, automotive and exploitation. 

To install Linux BackBox, here's the system requirements :

  •     32-bit or 64-bit processor
  •     512 MB of system memory (RAM)
  •     10 GB of disk space for installation
  •     Graphics card capable of 800×600 resolution
  •     DVD-ROM drive or USB port (3 GB)


The BackBox 4.6 includes an updated Linux Kernel 4.2 , updated Ruby 2.2 and hacking tools updation like beef, dirsearch, metasploit, volatility, wpscan, openvas, setoolkit, yara etc. 

Termed to be most hacker friendly Linux distribution, it contains in-built softwares like WPScan for WordPress vulnerability scanner, exHexEditor disk editor for huge files, SE Toolkit for doing phishing attacks, YARA pattern matching swiss knife for malware researchers and others. 

You can grab an ISO 32/64 bit of BackBox from the official website.

Also, if you are already using one of the releases of BlackBox Linux, follow these steps to upgrade to BackBox 4.6.

sudo apt-get update
sudo apt-get dist-upgrade
sudo apt-get install -f

Running on Xfce desktop, BackBox provides an alternative and highly customizable environment required for ethical hacking and security testing. It maintains it's own repository core called Launchpad, that is constantly updated to the latest stable version of the most known and used ethical hacking tools. 

Have you used BackBox? How's the experience!

How to reset lost admin password in Ubuntu

Sometimes, when you manage more than one OS, forgetting the username/password creates a lot of trouble for you. You want to login to your Ubuntu system and you can't remember the password. Also, when you are the admin of the a Linux Ubuntu systems that's being shared by other users, the chances of some user forgetting their login credentials are more and in that case, you will need to reset that too. 

This tutorial will help you to reset Admin password in Ubuntu if you have forgotten it. 

The first step is to boot up your Ubuntu System and as the BIOS screen shows up, press Shift key for the GRUB menu. In case you are dual booting your Ubuntu with Windows or Mac, you won't need to press the Shift key and the screen opens up with the Grub menu by default. 

The GNU GRUB menu will look like this. 


Open your Linux Ubuntu in recovery mode by selecting the second option from the list that will read something like this: 


Ubuntu, with Linux 3.16.0-37-generic (recovery mode).

The next screen will be the recovery menu. Scroll down to root - Drop to root shell prompt and press Enter. 

Now, you will have the root prompt but in read only mode. You will need to remount it with writing permissions. Type this command in the prompt:

mount -rw -o remount /

Now you can easily reset the forgotten password with the passwd command. Say, my username is hax0r and I want to reset it's password. 

passwd hax0r
Enter new UNIX password:
Retype new UNIX password:
passwd: password updated successfully

Once done, reboot your system and login with the new password you have just reset. To reboot, type exit to return to recovery menu and select resume normal boot to boot in your Ubuntu system. 

Now, if in case the user do not remember even the username, type in ls /home at the root prompt to get the list of users and follow the above procedure for changing the password in Ubuntu. 

Hope this tutorials helps to reset lost Admin password in Ubuntu. If you have anything to add, let me know in the comments.