Saturday 20 May 2017

Windows Subsystem for Linux : Suse and Fedora after Ubuntu!

Windows Subsystem for Linux is a compatibility layer developed to run Linux Binaries in a Windows 10 environment. Earlier, Microsoft and Canonical partnered together to bring Ubuntu to Windows Subsystem for Linux (WSL) giving the power of Bash and ability to run any Linux terminal application with ease in Windows. Microsoft then announced it's expansion by including Suse and Fedora along with Ubuntu and also the inclusion of all the three Linux Distributions in Windows app store. 


Microsoft in an attempt to lure Developers has done a great job by bringing the power of Linux in a Windows environment. Though I doubt someone who is using a Linux system for long would be interested in switching back to Windows and enjoying the power of Linux there, but for the new lot of developers who has been dual booting systems to be on Microsoft Windows for their general purpose tasks and Linux for development won't have to maintain two different Operating Systems. 

This is a smart move from Microsoft's side, for sure. But what about Linux?

Open Source enthusiasts are considering this a win for Linux. Penetrating in to the Windows world and gathering as many users to use an open source application (even if it's just a shell) is a positive thing. After all, it's serving the purpose of Open Source! Though the WSL is not based on Linux Kernel and is providing only a compatibility layer to run Linux binaries and shell and GUI applications are not supported, a user can still be able to use all the power that comes with a terminal. This is not a something in a virtual box and emulator like Cygwin but a complete, genuine, light weight environment. With two third of servers running on Linux, Microsoft is providing a tool for Sys Admins from Windows. 

With the availability of Ubuntu, Suse and Fedora in Windows App Store in coming days, the no. of users installing and using will increase over the time.

One of the Facebook users Brian Lagasse pointed out in a discussion to which I can't agree more.

I still can't wrap my head around why any one would want to use this. Is this like Cygwin or a Virtual Machine? Does this allow you to perform bash wizardry on windows servers? Did they realize Power Shell sucks and brought in the GNU to save face?
Any serious Open Source developer knows they just need an SSH terminal on any system to be able to tap into a massive amount of resources in a cloud, private datacenter or ghetto cluster in the basement made from recycled machines without licensing limiting the amount of processing power available or the amount of machines you can connect to or scale.
I don't see this affecting open Source Development in any way or actually benefiting it aside from windows users now able to learn bash and basic Linux locally instead of through SSH or a VM. We will probably continue to see an onslaught of backdoors and malware over the summer affecting the MS platforms which will hopefully result in more Open Source developers using Open Source.

On the other hand, some Linux users believe this is an attempt from Microsoft to move the Linux user base to Windows. Harsh reality is above 80% use Windows as their primary OS and most of the Linux users run Linux either in Virtual Box or dual boot it along with Windows. With the WSL, the need to keep two OS becomes irrelevant to a level (it's not if you are not a terminal geek and prefer the Linux systems over Windows). 

In coming years, we will know how the Microsoft strategy to bring Linux to Windows work for Linux. What do you think, is it a positive thing for the Linux world or we were better separate from the money-hungry Microsoft? Let us know in the comments. 

Wednesday 17 May 2017

GPD Pocket : a 7-inch Laptop running Ubuntu

I was searching for a less than 10-inch Laptop which is easier to carry, has a long battery life and comes with a configuration that can run Ubuntu / Mint smoothly. Since, Unity is the most resource hungry DE, anything which can run it can pretty much run any other Linux distribution. There was not much option for below 10-inch screen, but found some Asus and Acer laptops within 10-11 inch screen size running on Atom processor and a mediocre specification. 


Though cheap, I was not satisfied with the hardware and the search led to GPD Pocket fund raising on Indiegogo.

GPD Pocket had started a crowd funding for a 7-inch laptop that fits in the pocket with a decent hardware running Ubuntu 16.04 LTS out of the box. The product is still in Prototype state and believed to release in June 2017. The funding has crossed the required numbers!

Running on Intel Atom x7-Z8750 1.6 GHz quad core processor, the GPD Pocket has 7-inch IPS Gorilla Glass 3 touch screen display. It has a 128 GB solid state drive and 8 GB of RAM. It will feature a full qwerty keyboard with a track ball and two buttons for left and right clicks. 

GPD Pocket features a silver uni body made of magnesium alloy and includes a 7000 mAh battery to run for about 12 hours without any charging. The laptop comes with active cooling design and supports HDMI cable to connect to other display monitor. 


The retail price for GPD Pocket is US $599 with a special Indiegogo price of US $399 and it will start shipping worldwide in the month of June. 


Pros : 

1. A uni body magnesium alloy gives it a premium look.

2. It has a compact 7-inch size weighing just 480g, easy to carry and use. 

3. With a resolution of 1920x1200 and 324 pixel per inch, the screen is crispy and Corning Gorilla Glass gives it a premium touch. 

4. Built in speakers and support for Microphone, 1 USB Type-C and 1 year warranty for Device and Charger. 

Cons: 

1. 7-inch screen size may not be sufficient. May hurt your eyes if you work for longer. 

2. Keyboard is too compact and needs some practice to type fast. 

3. Price is high. in $500, you can get a nice laptop and install Ubuntu. 


My Opinion : Since I was searching for a laptop with decent specification and less than 10-inch screen, I am going to buy one. 

What do you think, will you buy one for your self? Let me know in the comments. 

Monday 15 May 2017

Share your Linux Desktop - User Submissions

We www.beopensource.com asked our followers over Facebook, Twitter and Google+ to share their Desktop with us and we have got some entries. In this article, we are presenting all the entries we have received. 

Submitted by : Luís Cardoso


OS: Debian
WM: Openbox (Arc theme)
Gtk3 & Icon: Arc theme
Wall: http://www.planwallpaper.com/static/images/wallpaper-2015_111528356_269.jpg
App Launcher is under construction by self.


Submitted by : Muaad Elsharif


Kubuntu 16.04.02


Mail me your entries to bloggingwithmb@gmail.com and I will add it to this list :) 

Monday 8 May 2017

Installing Arch Linux in VirtualBox

Arch is another Linux distribution that is very popular in the Linux users. Arch is installed as a minimal base system without any desktop environment and the user has to do the most part to set things up. It has its own package management system called pacman and uses a rolling release which needs one time installation and further updates are pushed on it. Now since it's a minimal system installation, most of things are to be configured by the user himself. If you are planning to install Arch Linux in VirtualBox, you have to take care of various things.

In this article, we will see how to install Arch Linux in VirtualBox. The steps to install it along side Windows is same. 


Download Arch Linux 


You can grab a copy of Arch Linux from the official website : https://www.archlinux.org/download/.

Current release is 2017.05.01 running on Kernel 4.10.13. I have a two month old copy with me, version 2017.03.01 and to save some bandwidth, I will install this in VirtualBox. The process will be same for any version, though.

Setting up VirtualBox


I assume you have downloaded and install Oracle VM VirtualBox. Start the application and click on New to create a new Virtual Machine. Give your Virtual Machine a name and choose the Type and Version. Typing Arch Linux in the name will set the Type to Linux and Version to Arch Linux 64-bit. Also, it will set the Memory Size to 1 GB. You can increase it if you have a good amount of RAM. Leave the hard disk option to Create a virtual hard disk now.


In the next screen, assign the size of the Virtual Disk you are creating for the Arch Linux. Leave all the options to their default value.


Installing Arch Linux in VirtualBox


After setting up the Virtual Machine, the next step is to install Arch Linux. Start the machine you have created and a dialogue box will appear asking you to select the virtual optical disk file or a physical optical drive to start your new virtual machine.


Click on the folder icon and navigate to ISO file which you have downloaded. Click on Start to start boot into Arch Linux.

The next screen is the boot screen. Select Boot Arch Linux option and after various checks and service start up, Arch Linux will boot up but in command line.


Partitioning your disk


The next step will be partitioning the drive that you have allocated. I will be selecting 10GB for root, 4 GB for SWAP and the remaining for home storage for home partition. I will use fdisk command for partition.

Type lsbl to check the disk name which we have created. It should be sda.


Enter the below command for partitioning.

fdisk /dev/sda


For Command (m for help):, type n, then p for primary partition, 1 as the default partition no., enter to select the default first sector, and +10G for assigning 10GB for root.

Repeat the same process for swap. For the third partition which is gonna be the home partition, do not enter the size but press enter. It will accept the default last sector.

To view the partitions you have just created, you can press p.


Enter w commands to write all these entries permanently. These won't be written unless you issue the w command.

Creating filesystems 


Next step is to create filesystem and format the partitions we have just created.

We will use mkfs to create the file system and mkswap command to create the swap space.

Type in the following commands for the above work:

mkfs.ext4 /dev/sda1
mkfs.ext4 /dev/sda3

for swap:

mkswap /dev/sda2
swapon /dev/sda2

You can check the partitioned disks by command lsblk.


The next step is to mount the filesystem we have created. Type in the following commands to mount.

mount /dev/sda1 /mnt
mkdir /mnt/home
mount /dev/sda3 /mnt/home

Installing the Base 


pacstrap command is used to initiate the base installation.

pacstrap /mnt base base-devel

This will download the necessary package and installs them.

The installation will take some minutes depending upon your internet speed.

The next step is to create a mount table. Type in the following command.

mount /dev/sda1 /mnt
genfstab /mnt>> /mnt/etc/fstab

Mount table makes sure which filesystesm are mounted while boot up.


The next step is to configure the Base system.

Type in the following commands :

arch-chroot /mnt /bin/bash

This will change the system root to Arch Linux installation.

Configuring locale settings and time zone


locale settings are used for system language. Open file /etc/locale.gen and uncomment the language you want to use. I had to un-comment en_GB.UTF-8. To un-comment, remove the hash # sign from the line.

Now, run the following command :

locale-gen 
echo LANG=en_GB.UTF-8 > /etc/locale.conf
export LANG=en_GB.UTF-8

This will create locale.conf file at /etc location. Create another file manually

vi /etc/vconsole.conf and add the following line : KEYMAP=us

Now, to configure the timezone, you will need to check it first. Type in the following command to get the available zone

ls /usr/share/zoneinfo/


check the subzone

ls /usr/share/zoneinfo/


Once decided, set the timezone by typing the following command :

ln -s /usr/share/zoneinfo/Asia/Kolkata /etc/localtime

Next step is to set the hardware clock. time the following command :

hwclock --systohc --utc

Setting host names, root user, passwords 


We are on the verge of competing installation of Arch Linux in a VirtualBox.

To create a hostname, type in the following commands:

echo archLinux > /etc/hostname

I am putting archLinux as the hostname. Add this hostname to the hosts file too. Host files are present at /etc/hosts.

nano /etc/hosts

and add archLinux.


Now run the an update to your system

pacman -Syu

This will synchronize the database package.

Create a root password and installing bootloader.


Use the command passwd to create the root password for your Arch Linux Root account.

The final step is to install a bootloader. Type the following command :

pacman -S grub
grub-install /dev/sda
grub-mkconfig -o /boot/grub/grub.cfg

You are done with Arch Installation, before restart, exit the chroot environment, and unmount the filesystem.

Type these commands :


exit

umount /mnt/home
umount /mnt
reboot

At reboot, select Boot existing OS. Enter root as username and password which you have set in the above step to login.

Now, lets install a Desktop Environment.

Installing GNOME desktop environment in Arch Linux 


You will first need to configure the network.

Type ip link to get the interface name. My interface name is enp0s3. Type the below command now.

vi /etc/systemd/network/enp0s3.network 

and add the following info in the file.

[Match]
name=en*


[Network]

DHCP=yes

Save the file and exit. Type the following command to activate the changes:

systemctl restart systemd-networkd
systemctl enable systemd-networkd

Before we have network connectivity, edit the file /etc/resolv.conf and and 2 name server entries :

nameserver 8.8.8.8
nameserver 8.8.4.4

Now, you should have the network connectivity. You can ping google.com to check it.

Installing X environment


This will install a platform and necessary components to install a desktop environment. Type the following command :

pacman -S xorg xorg-server

This will install X Windows System. We are going to install GNOME desktop environment. Type the command :

pacman -S gnome gnome-extra

The next step is to install a display manager on Arch Linux and enable it so that a login screen is displayed on the start-up. GNOME includes the default display manager gdm but we have to enable it.

systemctl start gdm.service
systemctl enable gdm.service

That's it. Restart your virtual machine and boot into Arch Linux. Input the login credentials and you will be presented with Arch Linux with GNOME desktop environments. 


Let me know in the comments if you face any error. Arch Wiki is very well managed and chances are that you will find solution to any problem you face during the installation. Also, Arch Linux experience in virtual box is not up to the level when you install it as a primary OS. 

Thursday 4 May 2017

5 Open Source Music players for Linux system

Open Source World provides so many options to choose from, for everything. If you are a music freak and looking for some Open Source music players for your Linux systems, you are at the right place. In this article, we have compiled 5 best open source music players, to fulfill all your needs. Lets get through the best music players for Linux systems and the steps to install them in your system.

Audacious


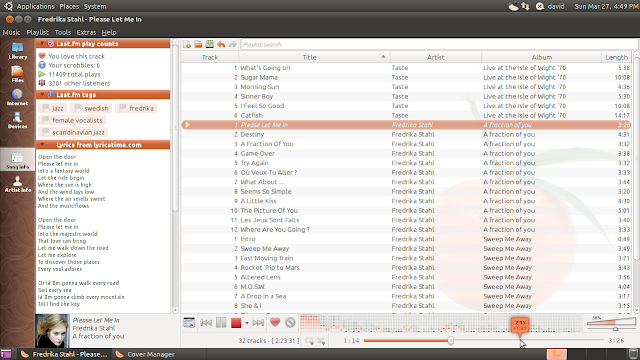
Audacious is an open-source cross platform music player which takes very less resources and gives you a good number of options. You can drag and drop folders and individual files to add to the running playlist, create and edit playlists and use equalizers according to your preference. You can even fetch the lyrics of a playing song for which the plugins are installed. 

Audacious


You can install Audacious from the package repository or by typing the following command in Terminal: 

Ubuntu : sudo apt-get install audacious
Fedora
yum install audacious
yum install audacious-plugins-freeworld to install important plugins, most notably the MP3 decoder plugin.
Arch : pacman -S audacious
Gentoo : emerge media-sound/audacious

Here's the official website of Audacious http://audacious-media-player.org/ for more info. 

Clementine


Clementine Music Player is another feature-rich music player for Linux systems. With an easy to use interface, it can help you search and play music in your system, create playlists, discover and download podcasts, even search and play songs uploaded to Box, DropBox, Google Drive and OneDrive, listen to internet radio from Spotify, SomaFM and others, and copy music to music players and iPod. 

Clementine


You can install Clementine from the official repo, or use the below terminal commands to install it in Ubuntu. 

sudo add-apt-repository ppa:me-davidsansome/clementine
sudo apt-get update
sudo apt-get install clementine

For other Linux distributions, you can visit the official download page : https://www.clementine-player.org/downloads 

Amarok


Amarok is a powerful cross platform music player and provides many exciting features. Amarok music player for Linux supporst drag and drop actions for songs, marking positions in tracks to listen from there later, creating dynamic playlists, multiple language translations, file tracking, playing audio CDs, and more. 

Amarok


Amarok music player is available for a large number of Linux distributions like Ubuntu and derivatives, Debian, Fedora, openSuse, gentoo, arch Linux, mageia and FreeBSD. 

Installing Amarok music player 

Ubuntu : sudo apt-get install amarok
Fedora : yum install amarok
Gentoo : emerge -av amarok
Arch : pacman -S amarok

Lollypop


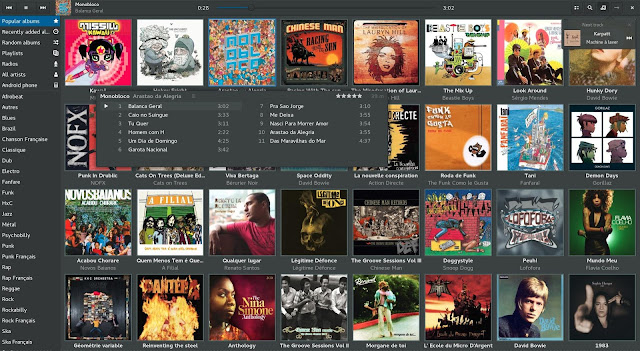
Lollypop is a nice music player that supports many audio formats. It has a party mode that lets the software decide the music for you. You can play music from web, create a playlist. get artists and tracks information from the web, and sync music with your android devices. Lollypop music player is available Ubuntu/Debian and derivatives, Arch Linux, FreeBSD, Fedora and OpenSUSE. 

Lollypop


You can check the download links and steps from the official page : https://gnumdk.github.io/lollypop-web/

VLC 


VLC is one of the most used free and open source cross platform media player that plays almost everything. Play songs and videos stored in your hard-drive, from DVDs, CDs, pen drives etc. 

VLC media player in Linux


You can install VLC Media player from the official repo. However, if you want to do it the command line way, here's the terminal inputs : 

Ubuntu / Debian : sudo apt-get install vlc

OpenSUSE

sudo zypper ar http://download.videolan.org/pub/vlc/SuSE/<SUSE version> VLC
sudo zypper mr -r VLC
sudo zypper in vlc
<SUSE version> can be 11.4, 12.3 or 13.1, 13.2, Tumbleweed, Factory

Arch : pacman -S vlc

Fedora

su -
dnf install https://download1.rpmfusion.org/free/fedora/rpmfusion-free-release-$(rpm -E %fedora).noarch.rpm
dnf install vlc
dnf install python-vlc npapi-vlc (optionals)
With so many choices, you can have a completely different open source music player for your Linux system. If you are using something that is not listed in above, let us know in the comment. I will try to include it in the above list. 

Monday 1 May 2017

Best Ubuntu Laptops to buy

There is not much in the list, as most of the manufacturers prefer to ship their product with Windows. Lately, some of them are launching both Windows and Linux OS and in coming days, we might see some more of these in the markets.

If you are looking for a dedicated Laptop running Ubuntu out of the box, we have selected 3 of the best brands that is available in market. These are the best Ubuntu laptops you can buy. 


1. System76


System76 has been known to provide powerful systems running Ubuntu from a long time. The technical specifications reads: 

Operating System   Ubuntu 16.04.2 LTS (64-bit) or Ubuntu 17.04 (64-bit)
Processor   7th Gen Intel® Core i3-7100U or i7-7500U
i3-7100U: 2.4 GHz – 3 MB cache – 2 cores – 4 threads
i7-7500U: 2.7 up to 3.5 GHz – 4 MB cache – 2 cores – 4 threads
Display   14.″ 1920×1080 IPS, Matte Finish
Graphics   Intel® HD Graphics 620
Memory   Up to 32 GB Dual Channel DDR4 @ 2133 MHz
Storage   M.2 SSD, 2.5″ 7mm height drive. Up to 5 TB total.
Expansion    USB 3.1 Type-C, USB 3.0 Type-A, USB 2.0 Type-A, SD Card Reader
Input    Multitouch Touchpad, Chiclet Keyboard
Networking    Gigabit Ethernet, Intel® Wireless-AC, Bluetooth
Video Ports   HDMI, VGA
Audio   Stereo Speakers, Stereo Mic, Headphone Jack, Mic Jack, 5.1 channel (HDMI)
Camera   720p (1280×960) HD Webcam
Security   Kensington® Lock
Battery   Removable 4 Cell Smart Li-Ion – 44 Wh
Charger   40 W, AC-in 100–240 V, 50–60 Hz
Dimensions   13.4″ × 9.5″ × 0.9″ (34.01 × 24.21 × 2.21 cm)
Weight   3.6 lbs. (1.6 kg.) Base weight. Varies on configuration.
Model   lemu7

System76 laptops are a bit over-priced as compared to others but provides a powerful systems. I customized one for myself running on 3.5 GHz i3-7100U processor (as I do not need it for video editing and rendering tasks), 16 GB Dual Channel DDR4 RAM, 120 GB SSD for OS drive and an additional 1 TB storage hard disk for saving my favorite files and movies and it costs me around $913. These System76 laptops make it to the best Ubuntu laptops which you can choose for yourself.

You can customize and buy one for yourself from the official website : www.system76.com

2. Dell XPS 13 Developer Edition 


Dell XPS 13 Developer Edition is the pick of the lot for me and the best Ubuntu laptop you can buy. Dell has got both Windows and Ubuntu version and there are options to customize according to your needs. Powered with InfinityEdge display, these 13-inch laptops are exceptionally thin and light and weighs only 2.7 pounds. The display is powered with UltraSharp QHD+ resolution with 276 ppi and a viewing angle of up to 170 degree. The laptops are touch friendly and provide a nice 13 hours battery life when using YouTube and browsing web. The build quality is awesome and the Corning Gorilla Glass NBT touch display option is up to 10 times more scratch resistant than others. 

I went to check the price for XPS 13 Developer Edition with 7th Gen Intel Core i5-7200U processor coupled with 8 GB of memory and 256 GB of solid state hard drive and it was $ 1,049. The color options available were silver and rose gold with rose gold costing an additional $49. Theres a Intel HD graphics card inclided and 1 year ProSupport Warranty from Dell. 

You can check out the complete specification and buy one for yourself from the Official Dell Website.

3. ZaReason UltraLap 5330


ZaReason is another Ubuntu laptops provider providing customization to the buyers. ZaReason UltraLap 5330 is one such laptop running Ubuntu out of the box. Running 7th generation Intel Core processor, the 14" laptop provides a FHD display with 1920x1080 resolution and weighs 3.6 lbs. There are 3 USB ports, 1 USB-C port, 1 USB 3.0 port and a USB 2.0 port. Again, when I customized UltraLap 5330 with i3-7100U processor with 16 GB RAM and 120 GB SSD and an additional 1 TB HDD for storing my files, the cost went up to $ 1,047. If you are looking for the detailed specification and buying one for yourself, here's the official ZaReason website.

If you would ask me, at any day I would prefer Dell XPS 13 Developer Edition. It is sleek, provides a good battery back up, is easily available in all the markets and support system is awesome. However, if you are not new to the Linux world, I would recommend you to buy a cheap Laptop of any manufacturer, replace the Windows with Ubuntu and feel the same experience.

Do you know any other Laptop that comes with pre-installed Linux Ubuntu? Let me know in the comments, I will update this article.