Monday 18 July 2016

Canonical warns of Ubuntu forum hack

Canonical in one of the article announced a security breach on Ubuntu forum using the widely known hacking technique, SQL injection. The security breach was discovered on July 14th, after a Ubuntu Forum Council member notified the the Canonical's IS team about a person claiming to have a copy of Forums database. 

Ubuntu Forum
Ubuntu Forum screenshot. Source: UbuntuForums.org
The hackers used the SQL injection technique to read data from the user tables thus gaining access to the username, email address and IP address for more than 2 million users. Since the Ubuntu Forums uses single sign on for logins, no active passwords were accessed. 

Canonical also claims that the attacker was not able to have access to Ubuntu Code repository and user passwords. Neither were they able to escalate past remote SQL read access and gain remote SQL write access to the forums database.

If you are unaware, Ubuntu forum is a Q/A place for Ubuntu users. Canonical found out that the breach was due to a vulnerability in the third party vBuleting platform that powers the forum, and they have patched it. They backed up the servers running vBulletin, wiped them clean and rebuilt them from the ground up. They also had reset the system and database passwords. The monitoring of third party vBulletin has been tightened and ModSecuriy, a web application firewall has been installed to help prevent similar attacks in future. 

This should not in any case makes you think Linux us less secure. Ubuntu Forum is a website and the hack has been possible due to a third - party app. The Linux and Ubuntu, and other Linux distributions are perfectly safe to use and offers the best security. 

Saturday 16 July 2016

How to move Unity Launcher to bottom in Ubuntu

With Ubuntu 16.04 Xenial Xerus, Ubuntu has added a feature of moving the Unity Launcher to the bottom of the screen that had stuck up to the left side till now. This has been a long awaited feature for Ubuntu users and has been rolled out in Unity 7. To move Unity launcher to bottom of the screen in Ubuntu, you will have to run a terminal command. 

Unity Launcher at the bottom of screen
Up til now, Canonical's founder Mark Shuttleworth has constantly refused the option of moving the Ubuntu launcher from it's default left position. 6 years have passed by since the Unity Desktop Environment was launched, and finally seeing the option is great. 

Now there may be questions like why is their the need of moving the Ubuntu launcher from it's default position. A daily user of Ubuntu like me prefer exactly where it is. But when you think about the users shifting from Windows to Ubuntu (or even trying), this brings some comfort in use. Also, the normal screen today come in a rectangular size allowing more icons to be put on the launcher when the launcher is at the bottom and not to the left.

Plus, the ultimate goal of a open source software / OS is to provide the freedom to use. So shouldn't the choice be left to the user as to where to put it. 

Now, lets see how you can move the Ubuntu launcher to bottom and revert back to left in case you don't find it much useful. 

Moving Unity Launcher to bottom

Open Terminal by pressing Ctrl + Alt + T, or from the launcher. Type in the following command and press enter. 

gsettings set com.canonical.Unity.Launcher launcher-position Bottom

In case you feel the default left side for Ubuntu Launcher is fine, type in the following command in Terminal to revert back to original.

gsettings set com.canonical.Unity.Launcher launcher-position Left

There commands are one time and you don't need to run them for every session. There is no graphical way to move the launcher in Ubuntu. However, there is a third party tool called Unity Tweak Tool that gives you the option to move the launcher to left or bottom along with other features.

How to move launcher using Ubuntu Tweak Tool.

Go to Software Center and install the Ubuntu Tweak Tool. Once done, launch the tool and you will see the below options. 

Ubuntu Tweak Tool


Under the Unity Menu, you will find the "Launcher" option. Click on it, and you will the all different launcher options: 

Ubuntu Tweak Tool

You can select the position of Ubuntu Launcher from Left and Bottom. There is no "Right" and "Top" options available as of now. 

Do you like the launcher in left position or at the bottom? Tell us in the comments.  

Friday 15 July 2016

Creating a live USB for the Fedora 24

Once you have downloaded the Fedora 24 ISO file, you will need to burn it to a DVD or create a live USB. Burning to a DVD is simple process in Windows and right clicking on the ISO file and choosing burn to disc will do the job for you. A live USB can be used to try out the Fedora OS without installing it, or can be used to install as a primary OS or in a dual boot with Windows. That depends on your choice and preference. Here's how you can create a Fedora 24 live USB boot device. 

In Windows 10 host.


Download the liveUSB Creator from Fedora website : https://fedorahosted.org/liveusb-creator/

Once the download completes, trigger the installation set up and finish it. 

Launch the installation, and select the live CD image and the target device which will be the Pen Drive. 


You can also download the Fedora version if you do not have the ISO file already downloaded. 

Live USB creator works perfect in Windows 10 and is a complete non-destructive install i.e. you do not need to format or remove data from your Pen Drive and it won't harm the already present data there. 

It also supports the automatic downloading the various Fedora releases and the application will automatically detect all of the removable devices. 

Live USB creator allows the persistent storage creation, i.e. lets you allocate extra space on your USB stick where you can save files and changes in the OS which will persist in the next boot. 

Creating live USB for Fedora from Ubuntu


The first way to create a Fedora 24 live USB is by using the Unetbootin software. You can download the Unetbootin software from the Ubuntu Software Center. Unetbootin allows for the installation of various Linux/BSD distributions to a partition or USB drive, so it's a no different from a standard install, only it doesn't need a CD. It can create a dual-boot install or replace the existing OS entirely. Once you launch the software, you will get the below screen.


Select the desired Distribution and the Version, navigate to the path where you have stored the ISO diskimage which you have downloaded. Select the type which should be "USB Drive" and drive of the removable media. Once done, click OK and a live Fedora 24 bootable USB drive will be created which you can use to try / install Fedora 24.

Second method to create a live USB for Fedora 24 is through the command line. 

Plug in the USB disk and find out the disk its mounted on.

sudo fdisk -l

For me, it was /dev/sda3. Next step is to unmount this device

unmount /dev/sda3

Format the pen drive before you create the bootable disk and use the isohybrid command for an ISO to be recognized by the BIOS.

sudo mkdosfs -n 'driveName' -I /dev/sda3 -F 32
isohybrid filename.iso

Next step is to create the live USB from the ISO file. Use the dd command : 

sudo dd if=filename.iso of=/dev/sda3 bs=4k

Once done, you can sync and eject the device.  

sync
sudo eject /dev/sda3

Once you are done with creating live USB for Fedora 24, you can try installing Fedora 24 in Virtual Box. You can return to the complete installation for Fedora 24 for other details. 

Thursday 14 July 2016

Is it a good idea to run Ubuntu natively on Windows 10?

When the GitHubUser Guerra24 shared the image of Ubuntu Desktop - Unity 7 running on Windows 10 natively, the first thing that came in my mind was, why! Why is there the need (of course for Canonical) to run on Windows? 

Guerra24 on the GitHub wrote that he was able to run Unity inside WSL, and although there were many issues and bugs and it's just a sort of hack, the image posted by him was promising. He was also able to port xfce4 desktop environment. 


We can see the Ubuntu and Unity running on Windows. The only programs that can be run are from the panel and using terminal is not possible as of now. You can't logout from Ubuntu by the usual process, you will need to exit by closing compiz. 

ZDNet even published an article for running the native Ubuntu on Windows 10

Now, coming to the question. Why is there even a need of running an open-source OS on to the most closed OS? Isn't there a conflict of two different mindset? When the Bash for Windows was launched, it received a mix reaction among the Linux world. Some supported it saying it will improve the reach of the Ubuntu and Linux which is at present has less than 3% market share. Others just hated it, saying it to be the Canonical's worst decision. 

If you want to run Linux Ubuntu or any other distro, you can just run it without Windows at all. Canonical has been able to make Ubuntu very user friendly and the wide support of open source enthusiasts has made almost every thing available. There is nothing you can't do on a Linux Mint or Ubuntu. Yes, there comes some geeky steps sometimes, but someone using a PC should be able to carry out these tasks with a little help of Google. 

On the other hand, to those who finds Windows 10 user Interface and ease of use better than a Linux OS but still want the powerful console, this is a good thing. Its like, hey I am using a nice OS along with the most powerful OS. 

Lets have a healthy discussion, post your views in the comment section. 

Wednesday 6 July 2016

Cub Linux - best of Chromium with best of Ubuntu

Cub Linux
Cub Linux
I was trying to find a Chromium OS alternative since the one managed by hexxeh at has not been updated from long, and I came to know about Cub Linux. Trying for about a week, I find it very fast and smooth and the support for Ubuntu Applications just added to the comfort. In this article, I am writing about the features and installation process of Cub Linux. Since, it's not possible for me to try out all the Linux Distributions along with the primary OS, I have been running it in Virtual Box and the tutorial to install Cub Linux targets the Virtual Box. But, the process to install it as a primary OS is almost the same and you won't find much problem. 

Cub Linux is an open source Operating System that combines the speed, Google integration and web apps of Chromium Browser with thousands of applications of Ubuntu. Formerly knows as Chromixium OS, the Cub Linux gets it's name from Chromium and Ubuntu and tries to provide the best of Chromium open source project with the open Source Ubuntu OS. It tried to mimic the appearance of Chrome OS and is based on Ubuntu 14.04 LTS release. 

Cub Linux harnesses the power of Google ecosystem without being tied to the cloud. It comes with the Chromium browser which can be used to use apps from the Chrome store. The OS comes with a pre-installed Chromium browser, a YouTube client and a gmail app. 

Minimum system requirement for Cub Linux


  • 1 GHz Intel/AMD processor
  • 512 MB (1GB recommended)
  • 4GB storage (8GB recommended)
  • Video graphics capable of 800 x 600 resolution (1024 x 600 recommended)
  • Internet access

Download links

You can download the 32/64GB Cub Linux from the Download page of website, or you can click on the below link for the direct download.


How to install Cub Linux 

Once you are done with the downloading ISO image from the above mentioned link, set up the Virtual Box with 1GB RAM and 8GB of storage. Once you link the ISO with Virtual Box, start the machine. You will get an option to choose from Try Cub and Install Cub. Select Install and the language from the left menu.


The next screen is the preparing step where it will ask you for 6GB of free storage, plugging of your laptop to a power source and connection to the internet. If the internet connection is unavailable, you will not be able to download and install the updates and third party softwares.


In the next screen, Installation type, it will ask the different options. You can select to encrypt the new Cub installation for security and use of LVM with the new Cub installation. 

The next two screens will ask you for your timezone and language. Select your preference. The second last screen will ask the username / password with which you can use the Cub Linux OS.


Please ignore the "weak password" option, I was not interested in thinking something complicated for trying out something in Virtual Box :) 

You are done with all the settings and once you will click Continue, the installation will proceed. It took me around half an hour for the installation to complete. I had to restart my PC once the installation of Cub Linux completed.

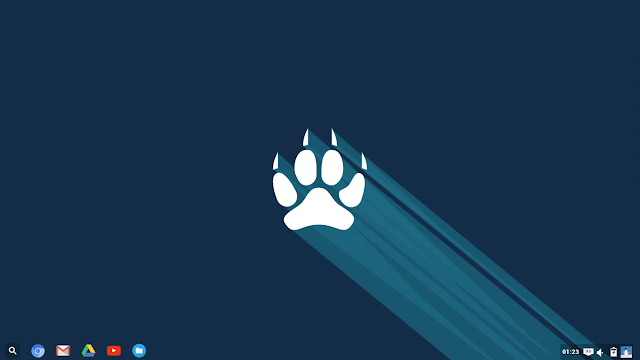
Here's what I got as the homescreen when I signed in with the credentials after the restart.


In the taskbar, you can find the Chromium browser, Gmail Client, Google Drive and YouTube icons. The overall User Experience was fast and smooth and the Cub OS worked so well that I am thinking of continuing with it for some more days. Who knows, it might end up on my other laptop as a primary OS. 

Just in case you have a spare desktop / laptop with very few resources, this Cub OS can be a perfect choice and you can give it a try.

Tuesday 5 July 2016

Wine 1.9.13 released, how to install in Linux

Wine 1.9.13 development release is now available to download and install for Linux users. This new release includes various bug fixes but since this is not a stable release, there may be some new bugs along the way. 


If you are a Linux users, chances are very less that you have never heard of Wine. Wine is a Linux application that helps in running several Windows Application in Linux by translating Windows API calls into POSIX calls on the fly, eliminating the performance and memory issue. This is a popular tool which Linux users use to run Windows based games on Linux. Also, to install Adobe Photoshop cs6 in Linux. However, we as a open source enthusiasts will ask you to use Best Photoshop alternative for Linux.

What new in Wine 1.9.13 development release

  • New version of Gecko engine based on Firefox 47
  • More shader Model 5 support in Direct3D
  • Unicode data updated to Unicode 9.0.0
  • Improvements to GDI paths and metafiles
  • More progress towards the Direct3D command stream
  • And various bug fixes. 


How to Install Wine 1.9.13 in Linux 


Ubuntu 

Open terminal and type the following commands to install Wine in Linux Ubuntu.

Enable 32 bit architecture.

sudo dpkg --add-architecture i386

Add the repository and update package.

sudo add-apt-repository ppa:wine/wine-builds
sudo apt-get update

Install the development branch.

sudo apt-get install --install-recommends winehq-devel

Debian

Enable 32 but package and install key which was used to sign packages:

sudo dpkg --add-architecture i386 wget https://dl.winehq.org/wine-builds/Release.key
sudo apt-key add Release.key

Next add the repository to /etc/apt/sources.list or create a *.list under /etc/apt/sources.list.d/ with the following content:

deb https://dl.winehq.org/wine-builds/debian/ DISTRO main

// replace DISTRO being either wheezy, jessie, stretch or sid

To avoid problems with missing dependencies, Wheezy users need to add the following to /etc/apt/sources.list if it's not already there.

deb http://ftp.de.debian.org/debian/ oldstable main

update package and install Wine 1.9.13

sudo apt-get update
sudo apt-get install winehq-devel

Fedora 23

Add the repository 

dnf config-manager --add-repo https://dl.winehq.org/wine-builds/fedora/23/winehq.repo

and type in the following command to install Wine 1.9.13

dnf install winehq-devel

Megeia

Install key which was used to sign package:

wget https://dl.winehq.org/wine-builds/Release.key
sudo rpm --import Release.key

For Mageia 5 32-bit

sudo urpmi.addmedia "WineHQ 32-bit" https://dl.winehq.org/wine-builds/mageia/5/i586/

Mageia 5 64-bit

sudo urpmi.addmedia "WineHQ 64-bit" https://dl.winehq.org/wine-builds/mageia/5/x86_64/

Install package for development branch:

sudo urpmi.update -a
sudo urpmi winehq-devel

If you are using any other distribution, let me know in the comments how you installed it, and I will add it to this list. 

Saturday 2 July 2016

Linux Mint 18 MATE and Cinnamon edition released

The popular Linux Distribution Linux Mint has released it's MATE and Cinnamon edition for the users. The Linux Mint 18 is a Long Term Support release which is to be supported till 2021. The new launches comes with many refinements and performance enhancements along with new features.

Linux Mint 18 Cinnamon / MATE Edition features 


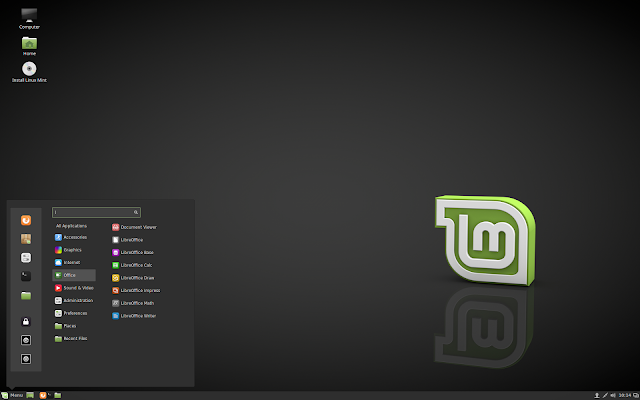
Linux Mint 18 Cinnamon Edition


Linux Mint 18 MATE Edition


Linux Mint 18 comes with the latest Cinnamon 3.0. X-apps has been integrated to produce better generic applications for desktop environments and use the modern toolkits and technologies in a traditional user interface. These X-apps are developed to work in every environments amd provide the functionality users enjoy. The following X-apps are there in Linux Mind 18.

  • Xed - default text editor
  • Xviewer - default image viewer
  • Xreaders - default pdf reader
  • Xplayer - default media player for music and videos 
  • Pix - app to organise the photos 

The update manager received many improvements with new settings and the ability to select kernel updates is there now. The configuration of update manager has been eased out in the latest release. There are various other improvements and artworks improvements. You can read the complete features here

System requirements for Linux Mint Cinnamon edition and MATE editions are same : 


  • 512mb of RAM
  • Min of 9GB free space
  • 1024 x 768 resolution 

Download links:


In 2010, 6 years earlier Liinux Mint introduced a beautiful metallic theme called Mint-X. With the new Mint 18 release, Linux Mint has introduced Mint-Y interface that looks much modern, clean and professional. This theme is based on the popular Arc theme. 

Have you already upgraded to Linux Mint 18 Sarah? How's your experience till now, tell us in the comments.